Mounting the Unit
SecureSync units can be operated on a desktop or in a rack in a horizontal, right-side-up position. The location needs to be well-ventilated, clean and accessible.
Caution: For safety reasons the SecureSync unit is intended to be operated in a HORIZONTAL POSITION, RIGHT-SIDE-UP.
The SecureSync unit will install into any EIA standard 19-inch rack. SecureSync occupies one rack unit of space for installation, however, it is recommended to leave empty space of at least one rack unit above and below the SecureSync unit to allow for best ventilation.
Rack mounting requirements:
- The maximum ambient operating temperature must be observed.
- If the SecureSync unit is to be installed in a closed rack, or a rack with large amounts of other equipment, a rack cooling fan or fans should be part of the rack mount installation.
- Installation of the unit in a rack should be such that the amount of air flow required for safe operation of the equipment is not compromised.
- Follow the mounting directions described below to prevent uneven mechanical loading, possibly resulting in a hazardous condition.
- Do not overload power supply circuits. Use only supply circuits with adequate overload protection. For power requirements, see Input Power.
- Reliable grounding of rack-mounted equipment must be maintained. Particular attention must be given to supply connections other than direct connections to the branch circuit (e.g., use of power strips).
Rack Mounting (Ears)
The SecureSync
- 2 each 2400-1000-0714 equipment rack mount ears
- 6 each HM20R-04R7-0010 M4 flat head Phillips screws
The 2400-0000-0704 ruggedization ancillary kit (optional) contains additional mounting items available for purchase:
- 2 each 2400-1000-0706 rear rack mount ears
- 2 each HM20R-04R7-0010 M4 flat head Phillips screws
The following customer supplied items are also needed:
- 4 each #10-32 pan head rack mount screws
- 1 each #2 Phillips head screwdriver
- 1 each 3/32" straight screwdriver
To rack mount the SecureSync unit:
-
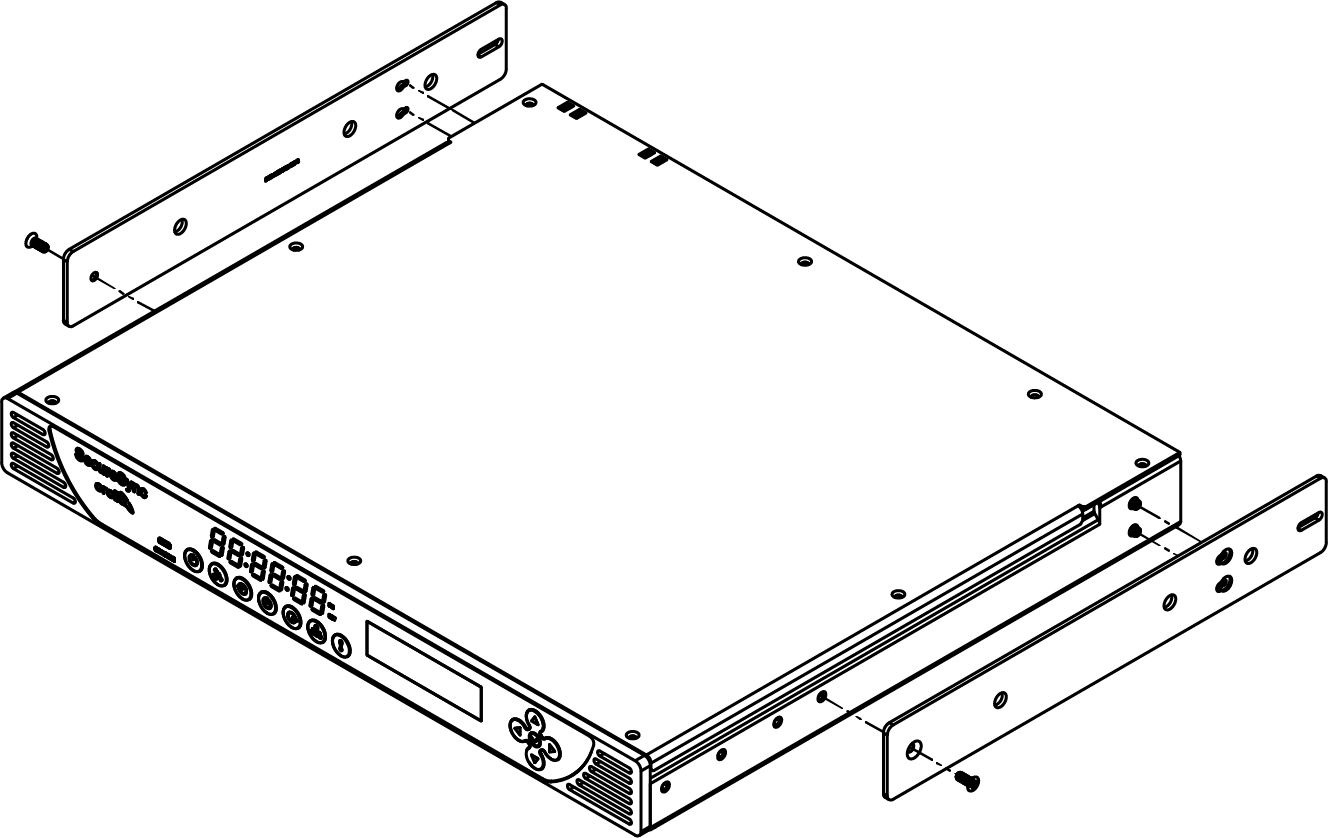
Attach the 2400-1000-0714 rack mount ears to the sides of the SecureSync with the ears facing outward, aligned with the front edge of the SecureSync front panel. (See image below). To secure, use the #2 Phillips screwdriver, and 3 each of the HM20R-04R7-0010 M4 flat head Phillips screws per side.

Rack mount installation
- Secure the rack mount brackets to the rack using the #10-32 rack mount screws and #2 Phillips head screwdriver, 2 each per side of the rack.
-
If you purchased additional rear rack mounts, you will align the holes with the available pegs near the rear of the unit and slide the rail forward into place.
Secure the mount with the screw hole closest to the front of the chassis using 1 each of the supplied HM20R-04R7-0010 screws per side.
Rear rack mount installation