+1.585.321.5800
Front Panel
All GSG-5/6 simulators have similar front panels. On the right side are the controls used for managing scenario execution and for display navigation. At the bottom are the numeric keys used to input scenario parameters and other configuration.
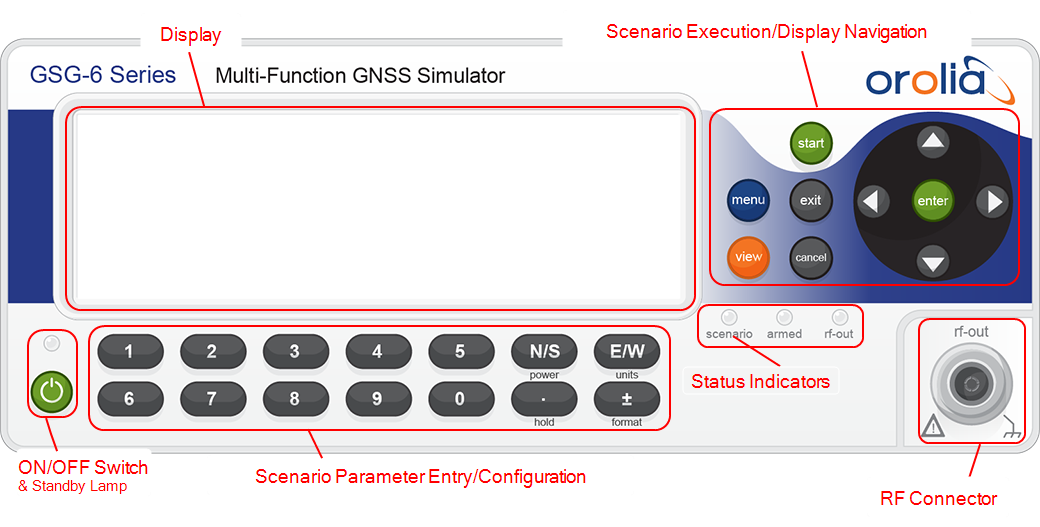
GSG front panel
There are three status indicators on the front panel. When the unit is idle, all three indicators are off.
- scenario will blink when a scenario is running
-
armed (or: trig) is lit when the unit is armed, i.e. waiting for a trigger signal to start executing a scenario
- rf-out is lit when there is signal coming out of the RF-connector on the front panel.
Note: The N-type RF-connector is equipped with a DC block to prevent the flow of direct current up to 7VDC in order to protect the GSG unit.
Description of Keys
Power
The ON/OFF key is a toggling secondary power switch. Part of the instrument is always ON as long as power is applied, this standby condition is indicated by a red LED above the key. This indicator is consequently not lit while the instrument is in operation.
Start
- Press start to start the currently selected scenario.
- In the Signal Generator menu, press start to start transmitting.
Exit
- When editing a field, press exit to end the editing process, and save your changed field value. The field label will be highlighted.
- When not editing a field, press exit to return to the previous display, and save the changes you applied to the current display. Confirm your changes.
- When running a scenario, press exit to stop the scenario execution (same as cancel).
Cancel
- When editing a field, press cancel to abort the editing process, and discard any field changes. The field label will be highlighted instead.
- When not editing a field, press cancel to return to the previous display, and discard any changes you applied to the current display. Confirm your cancellation.
- When running a scenario, press cancel to stop the scenario execution (same as exit).
Menu
- When running a scenario, press menu to display the main scenario configuration (the scenario will continue to run.)
- When reviewing/editing configuration settings, press menu to exit the current sub-menu, and return to the main menu, regardless of the current display. You will be asked to save your changes (same as exit).
View
- When running a scenario, press view to toggle between the available views.
- In the main menu, pressing view will act as a shortcut to the configuration display of the currently selected scenario.
- In the Options menu, press view to make a selection (same as enter).
Enter
- Press enter to make a selection.
Arrows
- Press any of the arrow keys to navigate in displays.
- When editing an integer value, press the UP/DOWN arrows to incrementally increase or decrease the value.
N/S
- When editing latitude, press N/S to toggle between north and south latitude.
- During scenario execution, press N/S to open the transmit power menu, in order to adjust the scenario's noise settings.
E/W
- When editing longitude, press E/W to toggle between east and west longitude.
- During scenario execution, press E/W to adjust the units displayed for Altitude and Speed (m/m/s > ft/kn > ft/mph).
Numeric Keys
- Press the numeric keys to input numbers.
+/– (format)
- When editing numbers, press +/– (format) to toggle between the positive and negative value.
- When configuring or executing a scenario, press +/– (format) to change the coordinate format between geodetic coordinates, and ECEF format.
- In scenario execution, View 2/5 and higher, press +/– (format) to switch between frequency bands (L1, L2 and L5).
[.] (hold)
- Use the "DOT" [.] (hold) key together with numeric keys, where appropriate.
- During scenario execution, press the [.] (hold) key to hold/resume the simulated movement (trajectory).
- While a scenario is loading, press the [.] (hold) key to initiate a scenario arming from the front panel.