+1.585.321.5800
Connecting StudioView to GSG
StudioView needs to be connected to your GSG unit so that you can up-/download files, record data, or use the GSG web interface.
On the GSG side, you can use the Ethernet port, USB port, or GPIB interface to establish the hardware connection. On the StudioView side, the Connections Manager  tool is used to detect and configure the connection.
Once you have connected a cable to your GSG unit, follow the procedure below to establish communication between StudioView and the GSG unit (Ethernet is used as an example).
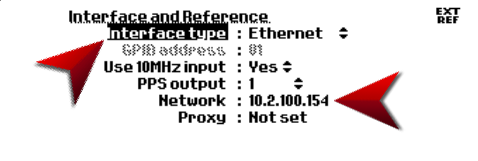
- On the GSG unit, navigate to Options > Interface and Reference:
- Select the Interface type that matches your hardware configuration, i.e. the connection between the GSG unit and the StudioView computer: TCP/IP, USB, or GPIB (note that SCPI-Raw does not work with StudioView).
- In the same menu dialog, take note of the Network address displayed.
- Launch StudioView on a PC. From the main menu, or the TOOLS dropdown menu, select the tool you would like to use e.g., the GSG web interface
 , the Uploader
  , or the Data recorder
  .
. - In the tool window, next to the Address field, click the Connections button. The Connections Manager window will be displayed, showing a list of previously created connections:
- Enter the IP address that was displayed under Step 3. above, and click
 to validate the connection. Click OK to close validation dialog. If the connection was successful, click OK to add this connection.
 - Highlight your connection (blue background) and click OK. The StudioView tool window should now show the connection to your GSG unit. (Note: The actual connection (e.g., for the Data Recorder) will not be established until you press the Start button.)
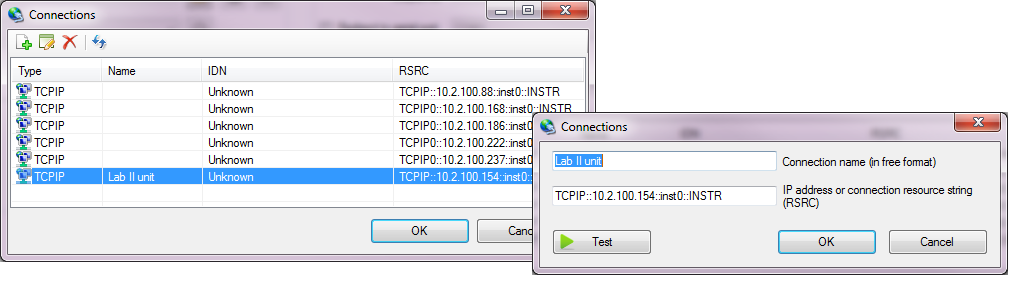
If you can see the connection pointing to your GSG unit, click it and then click OK. To refresh the list and search for more GPIB or USB devices, press the Refresh button. Otherwise click the Add
  icon to add a new connection: