+1.585.321.5800
Configuring A-GPS
To review or configure SecureSync's A-GPS settings:
- Navigate to INTERFACES: REFERENCES > GNSS Reference. The GNSS screen will be displayed.
- In the GNSS Reference panel on the right, click the GEAR button next to GNSS 0.
-
In the GNSS 0 window, locate the A-GPS panel at the bottom.
- Configure the menu options as required:
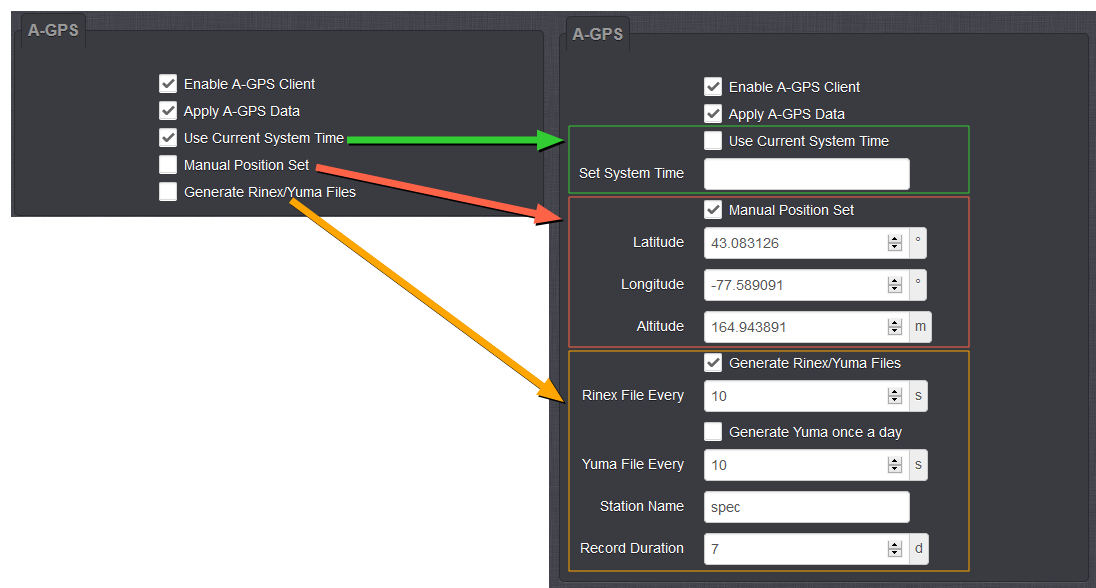
Note: The options displayed on your screen depend on your system configuration.
This feature will schedule assistance data to be collected and updated every hour. On startup, if data is present, it will be sent to the receiver.
If this option is selected, SecureSync will immediately apply the time, position and satellite data to the receiver once you click Submit.
Time and position are user-configurable via the next two menu options; SecureSync collects A-GPS satellite data from an external source automatically.
Note: Once you click Submit, any parameters entered under Apply A-GPS Data will override the System time and position data. Exercise caution when using this feature, since it could negatively impact the GNSS receiver operation.
Apply SecureSync's currently used System time to the GNSS receiver.
Enter a specific date and time, instead of the System time. This may be useful if the System time is known to be incorrect, or if you need a time in the past or future e.g., for simulation purposes. Enter the date and time by using the displayed calendar and time sliders.
By accurately entering latitude, longitude (both in decimal degrees), and altitude (in meters, WGS-84) of your antenna, SecureSync can use this data during the satellite tracking/adjustment process, which typically leads to a quicker "fix". It is recommended to enter the position as accurately as possible. For more information, see Manually Setting the GNSS Position.
Note: When manually setting a position, SecureSync must be in one of the stationary modes, Standard or Single Satellite (see "Receiver Mode" above).
Note: Regardless of which receiver is installed in your unit, the GNSS [x] Status window will display the text "Server A-GNSS Status/Data", even though RES-SMT GG receivers support only GPS server functionality.
RES-SMT GG receiver
If the option RINEX Server License (OPT-AGP) and a RES-SMT GG GNSS receiver are installed on your SecureSync, it can be operated as an A-GPS server. An A-GPS server allows the collection of RINEX3-formatted navigation files and GPS almanac files. These files can then be accessed by other devices (e.g., GSG-series signal simulators) on your network, making this SecureSync unit a valid source for A-GNSS ephemeris and almanac data.
M8T receiver
If the option RINEX Server License (OPT-AGP) and a u-blox M8T GNSS receiver are installed on your SecureSync, it can be operated as an A-GNSS server by providing you the option to select not just GPS, but also Galileo, GLONASS, and/or BeiDou, thus allowing the collection of RINEX3 navigation files and almanac files for the GPS, Galileo, GLONASS, and/or BeiDou constellations.
Based on accessible and valid GNSS data, SecureSync generates its own ephemeris and almanac data, and stores it in RINEX files and YUMA files, respectively.
Note: RINEX files (ephemeris data) must be updated no later than every 2 hours, because the ephemeris data is valid for 4 hours.
Note that you can specify for a Trimble RES-SMT GG receiver how often the RINEX3 data is updated ("Generate Rinex File Every ... second"). This is not needed for u-blox M8T receivers since their data will be updated as needed automatically.
You can also determine how often, or at what time each day the YUMA almanac files will be created. Also, you can assign a 4-character Station Name to be used in the files generated by this unit so that their location can later be identified. Under Record Duration, you can determine after how many days the history files will be overwritten.
Note: YUMA files (almanac data) are valid for day.
The files can be remotely accessed via the /pub path on the SecureSync or via the mapped drive.
- Navigate to TOOLS > SYSTEM: Upgrade/Backup. In the System Configuration panel the option OPT-AGP A-GPS RINEX Server must be present.
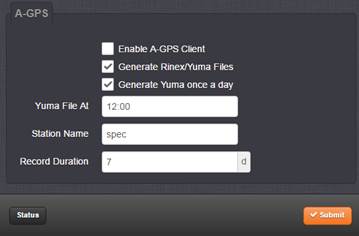
If an A-GPS RINEX Server License is installed on your unit, you have to activate it:
- Navigate to INTERFACES > GNSS Reference, and click the GEAR button next to GNSS 0.
- In the A-GPS panel, check the box Generate RINEX/YUMA Files and populate the following options:

- Trimble RES-SMT GG receivers only: RINEX File Every: [default = 10 s]
- Generate YUMA once a day:
- If checked [default], enter the desired-time-of-day in the field YUMA File At [default = 12:00].
- If unchecked, determine how often a YUMA file is generated under YUMA File Every [default=10 s; range = 10 s to 86400 s (1/day)].
- Station Name: Enter an alphanumeric 4-letter station name for the server [default: spec]. The names of the files generated will include the station name.
- Record Duration: Determine the duration for how long to keep the generated data before it gets overwritten [default: 7 days; range = between 2 and 400 days]
- Click Submit to start logging ephemeris and almanac data.
- Once you submitted the changes, verify that the setup was successful by clicking on Status, and confirming that the indicator lamp for Server A-GPS Status is green/ENABLED. The Server A-GPS Data indicator will be green if the RINEX server is running and the GPS receiver is valid in time and PPS.
Any device that can use RINEX data, can be directed to the locations where they are stored. For example, Orolia's GSG-series GNSS simulators allow for a server location to be set. With other equipment, you can also download the data to your computer, and then move the files to where they are needed.
To download the data to a client computer, point your computer's web browser to the following address:
- For hourly ephemeris data:
http://[IP address of your unit]/files/pub/gps/data/hourly/[YYYY]/[ZZZ]/hour[ZZZ]0.15n.Z
-
For daily ephemeris data:
http://[IP address of your unit]/files/pub/gps/data/daily/[YYYY]/[ZZZ]/15n/spec[ZZZ]0.15n.Z
- For almanac data:
http://[IP address of your unit]/files/pub/gps/data/almanac/[YYYY]/[ZZZ]/[ZZZ].alm
Where: YYYY: Year (Example: "2017"), and ZZZ: Day of year (Example: "050" for 19-February)