+1.585.321.5800
Network Ports
Ports act as communication endpoints in a network. The hardware configuration of your unit will determine which ports (e.g., Eth0, Eth1, ...) are available for use. Before using a port, it needs to be enabled and configured.
To enable & configure, or view a network port:
- Navigate to MANAGEMENT > NETWORK: Network Setup.
- The Ports panel on the right side of the screen lists the available Ethernet ports, and their connection status:
- Green: CONNECTED (showing the connection speed)
- Yellow: CABLE UNPLUGGED (the port is enabled but there is no cable attached)
- Red: DISABLED.
- If the port is not already enabled, in the Edit Ethernet Ports Settings window, click the Enable check box. The Edit Ethernet Ports Settings window will expand to show the options needed to complete the port setup.
- Fill in the fields as required:
- Autonegotiation: This box should be checked to allow the system to determine the speed and duplex of the connection. If it becomes necessary to manually set the connection, uncheck Autonegotiation and complete the following fields:
- Speed: Choose the correct speed between 10, 100, and 1000 Mb/s
- Duplex: Choose between Full and Half duplex.
- Domain: This is the domain name to be associated with this port.
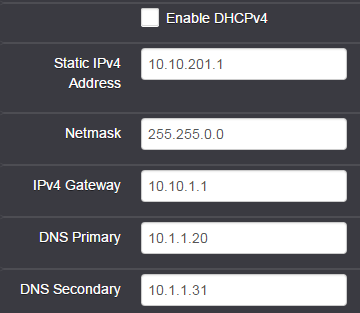
- Enable DHCPv4: Check this box to enable the delivery of IP addresses from a DHCP Server using the DHCPv4 protocol. This box is checked by default. Should you disable (uncheck) DHCPv4, the following fields will display and must be completed:

- Static IPv4 Address: This is the unique address assigned by the network administrator. The default static IP address of the SecureSync unit is 10.10.201.1. In the format “
#.#.#.#” with no leading zeroes or spaces, where each ‘#’ is a decimal integer from the range [0,255].
ETH port Default "static lease"
IP addressETH0 10.10.201.1 ETH1 10.10.201.2 ETH2 10.10.201.3 ETH3 10.10.201.4 - Netmask: This is the network subnet mask assigned by the network administrator. In the form “
xxx.xxx.xxx.xxx.” See Subnet Mask Values for a list of subnet mask values. - IPv4 Gateway: The gateway (default router) address is needed if communication to the SecureSync is made outside of the local network. By default, the gateway is disabled.
- DNS Primary: This is the primary DNS address to be used for this port.
Depending on how your DHCP server is configured, this is set automatically once DHCP is enabled. Alternatively, you may configure your DHCP server to NOT use a DNS address. When DHCP is disabled, DNS Primary is set manually, using the format "#.#.#.#" with no leading zeroes or spaces, where each ‘#’ is a decimal integer from the range [0,255]. - DNS Secondary: This is the secondary DNS address to be used for this port. Depending on how your DHCP server is configured, this is set automatically once DHCP is enabled, or your DHCP server may be configured NOT to set a DNS address.
When DHCP is disabled, DNS Secondary is set manually, using the format “#.#.#.#” with no leading zeroes or spaces, where each ‘#’ is a decimal integer from the range [0,255].
- Static IPv4 Address: This is the unique address assigned by the network administrator. The default static IP address of the SecureSync unit is 10.10.201.1. In the format “
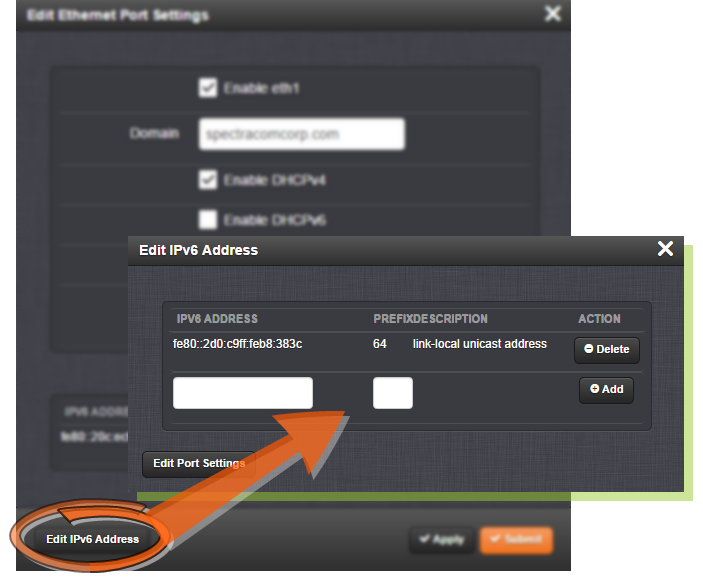
- Enable DHCPv6: Check this box to enable the delivery of IPv6 addresses from a DHCP Server using the DHCPv6 protocol.
- IPv6 addresses can be added and deleted by clicking the Edit IPv6 Address button at the bottom of the screen:

Note: If the button is not displayed, you need to Enable this port first, and click Submit.
- Enable SLAAC: Check this box to enable stateless address auto configuration.
- MTU: Maximum Transmission Unit. Range (for Ethernet v2): Default: 1500 bytes. Smaller packages are recommended, if encapsulation is required e.g., to meet encryption needs, which would cause the maximum package size to be exceeded.
- Autonegotiation: This box should be checked to allow the system to determine the speed and duplex of the connection. If it becomes necessary to manually set the connection, uncheck Autonegotiation and complete the following fields:
- To apply your changes, click Submit (the window will close), or Apply.
Locate the port you want to configure and click the GEAR button to enable & configure the port, or the INFO button to view the port status.
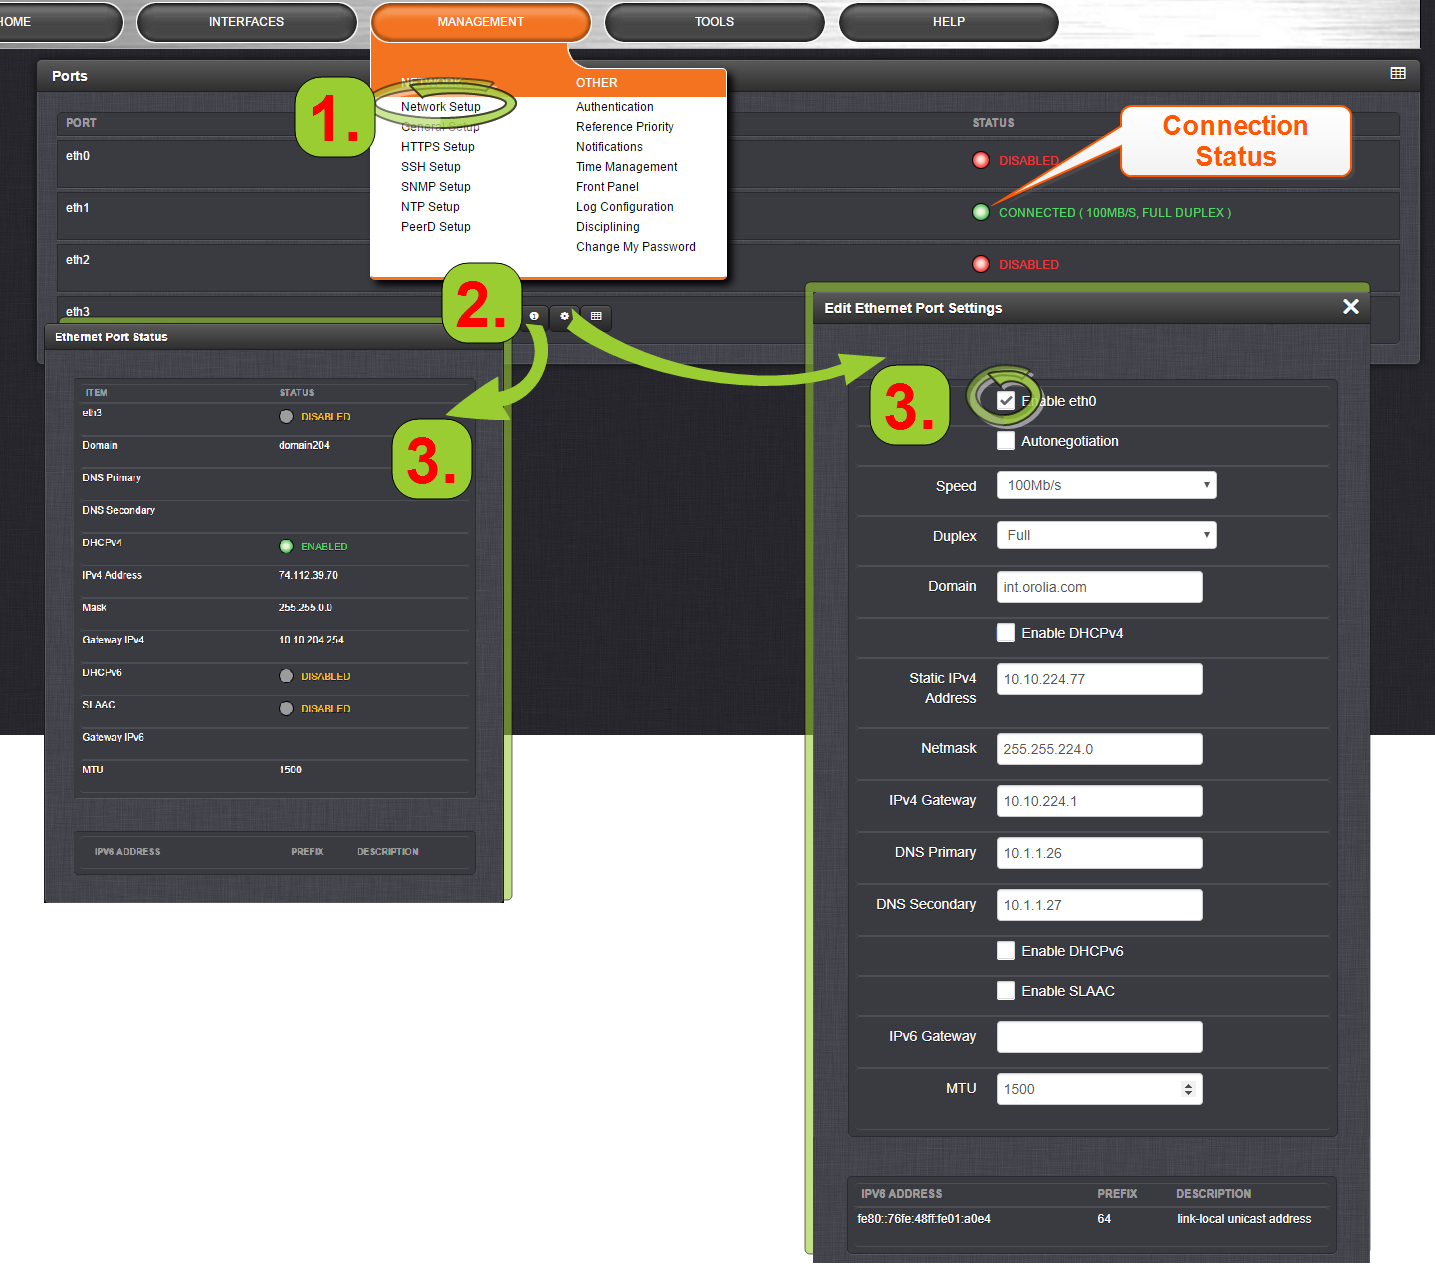
Note: The eth0 port is the built-in SecureSync Ethernet port (i.e., standard, not optional).