+1.585.321.5800
SNMP
SNMP (Simple Network Management Protocol) is a widely used application-layer protocol for managing and monitoring network elements. It has been defined by the Internet Architecture Board under RFC-1157 for exchanging management information between network devices, and is part of the TCP/IP protocol.
SNMP agents must be enabled and configured so that they can communicate with the network management system (NMS). The agent is also responsible for controlling the database of control variables defined in the Management Information Base (MIB).
SecureSync’s SNMP functionality supports SNMP versions V1, V2c and V3 (with SNMP Version 3 being a secure SNMP protocol).
Once SNMP is configured it will persist through reboot, and only needs to be reconfigured after performing a "clean" update process (thus restoring the factory default condition).
Note: In order to configure SNMP, you need ADMINISTRATOR rights.
To access the SNMP Setup screen:
Navigate to MANAGEMENT > NETWORK: SNMP Setup. The SNMP screen will display:
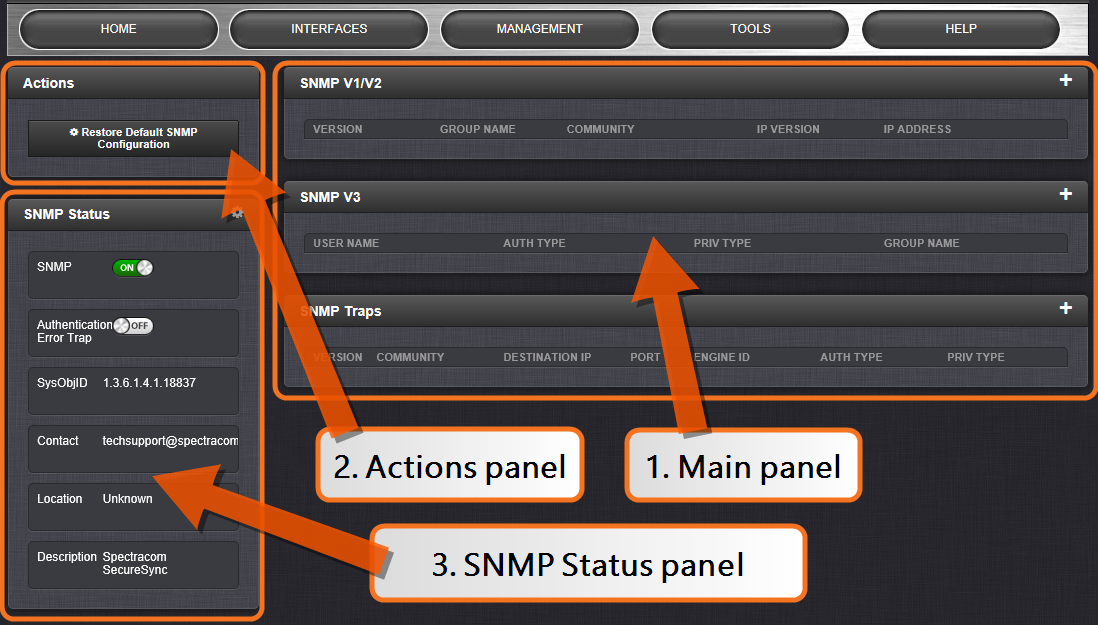
- The Main panel, which is subdivided into 3 displays:
- SNMP V1/V2: This panel allows configuration of SNMP v1 and v2c communities (used to restrict or allow access to SNMP). This tab allows the configurations for SNMP v1 and v2c, including the protocols allowed, permissions and Community names as well as the ability to permit or deny access to portions of the network. Clicking on the “+” symbol in the top-right corner opens the SNMP V1/V2c Settings for Access Screen. See SNMP V1/V2c.
- SNMP V3: This panel allows configuration of SNMP v3 functionality, including the user name, read/write permissions, authorization passwords as well as privilege Types and Passphrases. Clicking on the “+” symbol in the top-right corner opens the SNMP V3 Screen. See SNMP V3.
- SNMP Traps: This panel allows you to define different SNMP Managers that SNMP traps can be sent to over the network. This allows for SNMP Managers in different geographical areas to receive the same SNMP traps that Managers in other areas also receive. Clicking the PLUS icon in the top-right corner opens the SNMP Traps Settings Screen. See also SNMP Traps and Setting Up SNMP Notifications.
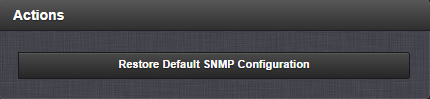
- The Actions panel, which contains the Restore Default SNMP Configuration button.
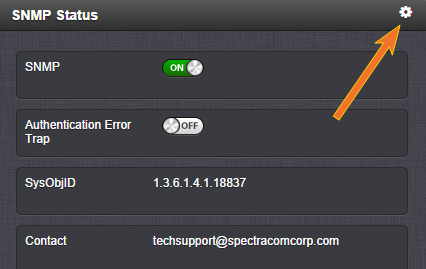
- The SNMP Status panel, which offers:
- An SNMP ON/OFF switch.
- An Authentication Error Trap ON/OFF switch.
- SysObjID—The System Object ID number. This is editable in the SNMP Status panel (see Configuring the SNMP Status).
- Contact Information—The email to contact for service. This is editable in the SNMP Status panel (see Configuring the SNMP Status).
- Location—The system location. This is editable in the SNMP Status panel (see Configuring the SNMP Status).
- Description—A simple product description. This is not editable in the SNMP Status.
The SNMP screen is divided into 3 panels:
To restore the SecureSync to its default SNMP configuration:
- Navigate to the MANAGEMENT > NETWORK: SNMP Setup screen.
- In the Actions panel, click the Restore Default SNMP Configuration button.
- Confirm that you want to restore the default settings in the pop-up message.
The SNMP Status Settings are sysObjectID, sysContact, and sysLocation. To configure SNMP Status Settings:
- Navigate to MANAGEMENT > NETWORK: SNMP Setup.
- In the SNMP Status panel on the left, click the GEAR icon in the top-right corner of the panel.
- The SNMP Status pop-up window will display:
- In the sysObjectID field, enter the SNMP system object ID.
- In the sysContact field, enter the e-mail information for the system contact you wish to use.
- In the sysLocation field, enter the system location of your SecureSync unit.
- Click Submit, or cancel by clicking the X-icon in the top-right corner.

The following settings can be configured in this window:
Orolia (formerly Spectracom)’s private enterprise MIB files can be extracted via File Transfer Protocol (FTP) from SecureSync, using an FTP client such as FileZilla or any other shareware/freeware FTP program.
To obtain the MIB files from SecureSync via FTP/SFTP:
- Using an FTP program, log in as an administrator.
- Through the FTP program, locate Orolia's Spectracom MIB files in the
/home/spectracom/mibsdirectory. - FTP the files to the desired location on your PC for later transfer to the SNMP Manager.
- Compile the MIB files onto the SNMP Manager.
Note: When compiling the MIB files, some SNMP Manager programs may require the MIB files to be named something other than the current names for the files. The MIB file names may be changed or edited as necessary to meet the requirements of the SNMP Manager. Refer to the SNMP Manager documentation for more information on these requirements.
Note: In addition to the Orolia/Spectracom MIB files, there are also some net-snmp MIB files provided. Net-snmp is the embedded SNMP agent that is used in the SecureSync and it provides traps to notify the user when it starts, restarts, or shuts down. These MIB files may also be compiled into your SNMP manager, if they are not already present.
Spectracom’s private enterprise MIB files can be requested and obtained from the Orola Customer Service department via email at TimingSupport@Orolia.com.
Note: By default, TimingSupport@Orolia.com is the address in the sysContact field of the SNMP Status panel of the SNMP Setup page.