+1.585.321.5800
Configuring NTP Autokey
Note: When you configure NTP Autokey, you must disable the NTP Service first, and then re-enable it after Autokey configuration is completed. See Dis-/Enabling NTP.
To configure NTP Autokey:
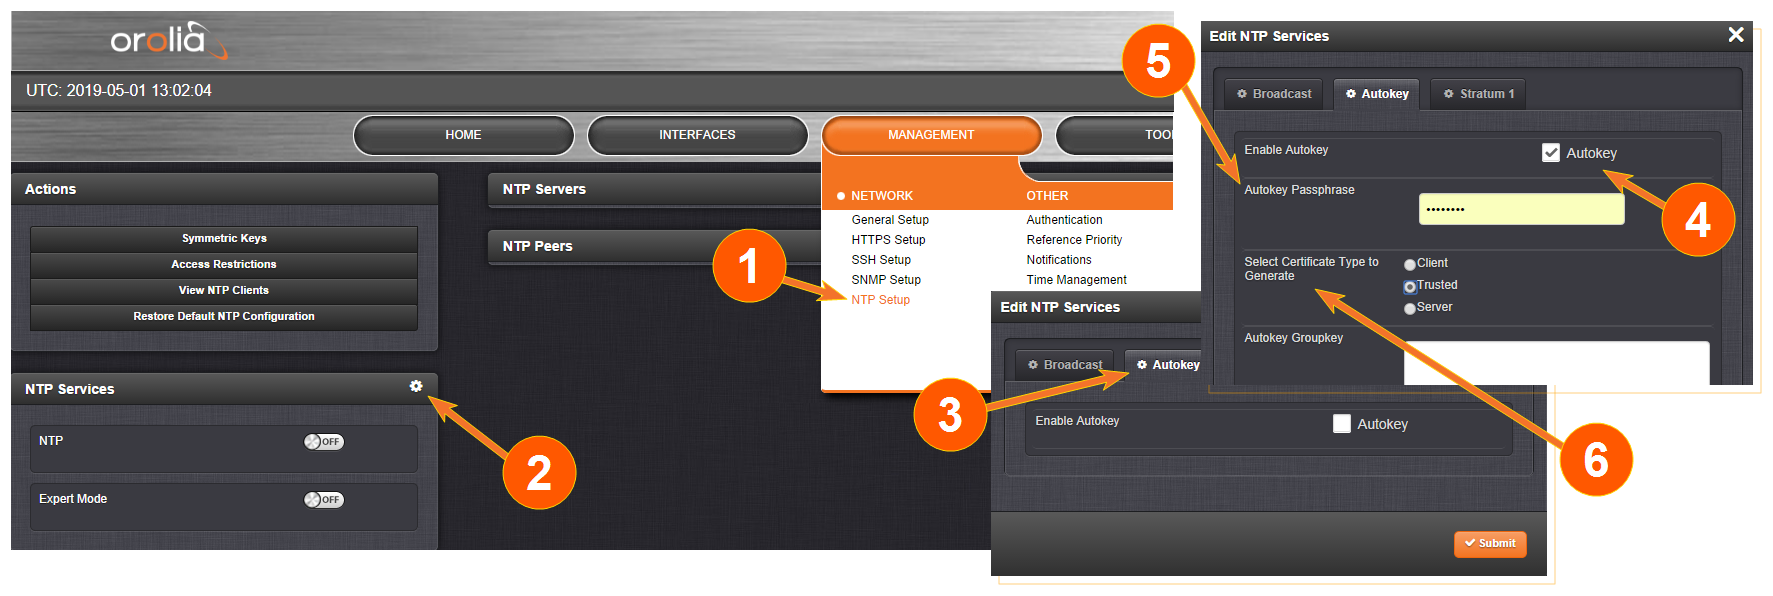
- Navigate to MANAGEMENT > NETWORK: NTP Setup.
- In the NTP Services panel, click the GEAR icon in the top-right corner.
- The Edit NTP Services window will display.
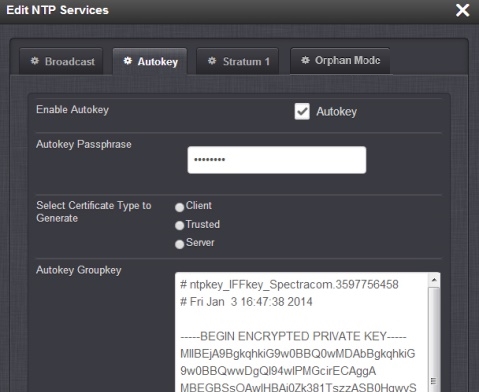
- Click the Autokey tab.
- Check the Autokey box.
- Fill in the Passphrase field by creating a passphrase (for a Trusted server—see Certificate Type below), or by using the existing passphrase of your trusted server (for Server and Client certificates).
- Select the Certificate Type for your server, by clicking the appropriate radio button for Server, Client, or Trusted.
- To designate a SecureSync as Trusted, click the Submit button. This will generate a new Groupkey.
- To designate a SecureSync as a Client or a Server, paste the generated Groupkey into the Groupkey box, and click the Submit button.
TRUSTED Server:
Before a server can be designated Client or Server status, one server must be designated as Trusted. When designating a server as Trusted:
1. Choose the Trusted radio button.
2. Click the Submit button.
A Groupkey is then generated for the network. This Groupkey will be pasted into the Groupkey box to designate another server on the network as Client or Server.
To configure an NTP Stratum-1 Server as Trusted Host with IFF Group/Client key:
- Define the Hostname of all NTP servers before proceeding. See NTP Servers: Adding, Configuring, Removing.
- Disable NTP.
- Ensure the time is accurate to a few seconds. Use NTP or manually set the clocks to set the system time.
- Verify this SecureSync is, in fact, NTP Stratum 1, and its Time, and 1PPS synchronization to GNSS are valid.
- Under the Autokey tab of the Edit NTP Services window:
- Enable Autokey—Check the box.
- Autokey Passphrase—Enter your Group members NTP Autokey password.
- Select Certificate Type to Generate—Do NOT enable Client.
- Select Trusted.
- Click Submit.
- Observe the IFF Group/Client Key appearing.
- This is the common IFF Group/Client Key. This key is shared between all Group members using this NTP Servers passphrase for ALL group members.
- Configure NTP as requiring authentication.
- Enable NTP in the NTP Services panel.
- Verify that NTP reaches occur, and that NTP eventually reaches Stratum 1.
To configure an NTP Stratum-1 Server, which is a Group Member, using a Client key:
- Define the Hostname, making sure it is unique, i.e. not the same as the trusted root server. See also General Network Settings.
- Disable NTP if enabled.
- Manually set the time or use NTP to set the system time.
- Under the Autokey tab of the Edit NTP Services window, enable:
- Enable Autokey—Check the box.
- Autokey Passphrase—Enter your Group members NTP Autokey password.
- Select Certificate Type to Generate—Do NOT enable Server
- Using the NTP Server containing the IFF Group/Common Key generate a Client Key using this NTP Server’s passphrase.
- Cut and paste the Client Key into the Autokey Groupkey text box.
- For all NTP Stratum-2 servers and higher stratum numbers, disable the following items under the Stratum-1 tab in the Edit NTP Services window:
- Prefer Stratum 1.
- Enable Stratum-1 1PPS.
- In the NTP Servers panel of the main window, add an NTP server and enable the Autokey option box. See NTP Servers: Adding, Configuring, Removing.
- Enable NTP in the NTP Services panel.
- Wait for NTP to synchronize to the NTP References provided.
To create an NTP Stratum-1 'Client Only' Server with a Client key:
- Define the Hostname, making sure that it is different from its trusted group server. See NTP Servers: Adding, Configuring, Removing.
- Disable NTP if enabled.
- Manually set the time or use NTP to set the system time.
- Under the Autokey tab of the Edit NTP Services window, enable:
- Enable Autokey—Check the box.
- Autokey Passphrase—Enter your Group members NTP Autokey password.
- Select Certificate Type to Generate—Select Client to enable Client only.
- Using the NTP Server containing the IFF Group/Client Key, copy the Group/Client key.
- Paste this Group/Client key into the Autokey Groupkey text box.
- For all NTP Stratum-2 servers and higher stratum numbers, under the Stratum-1 tab in the Edit NTP Services window configure the NTP Stratum-1 references:
- Disable Enable Stratum 1 Operation.
- Disable Enable Stratum 1 1PPS.
- In the NTP Servers panel of the main window, add an NTP server and enable the Autokey option box. See NTP Servers: Adding, Configuring, Removing.
- Wait for NTP to synchronize to the NTP References provided.