+1.585.321.5800
NTP Servers: Adding, Configuring, Removing
To add, configure, or remove an NTP Server:
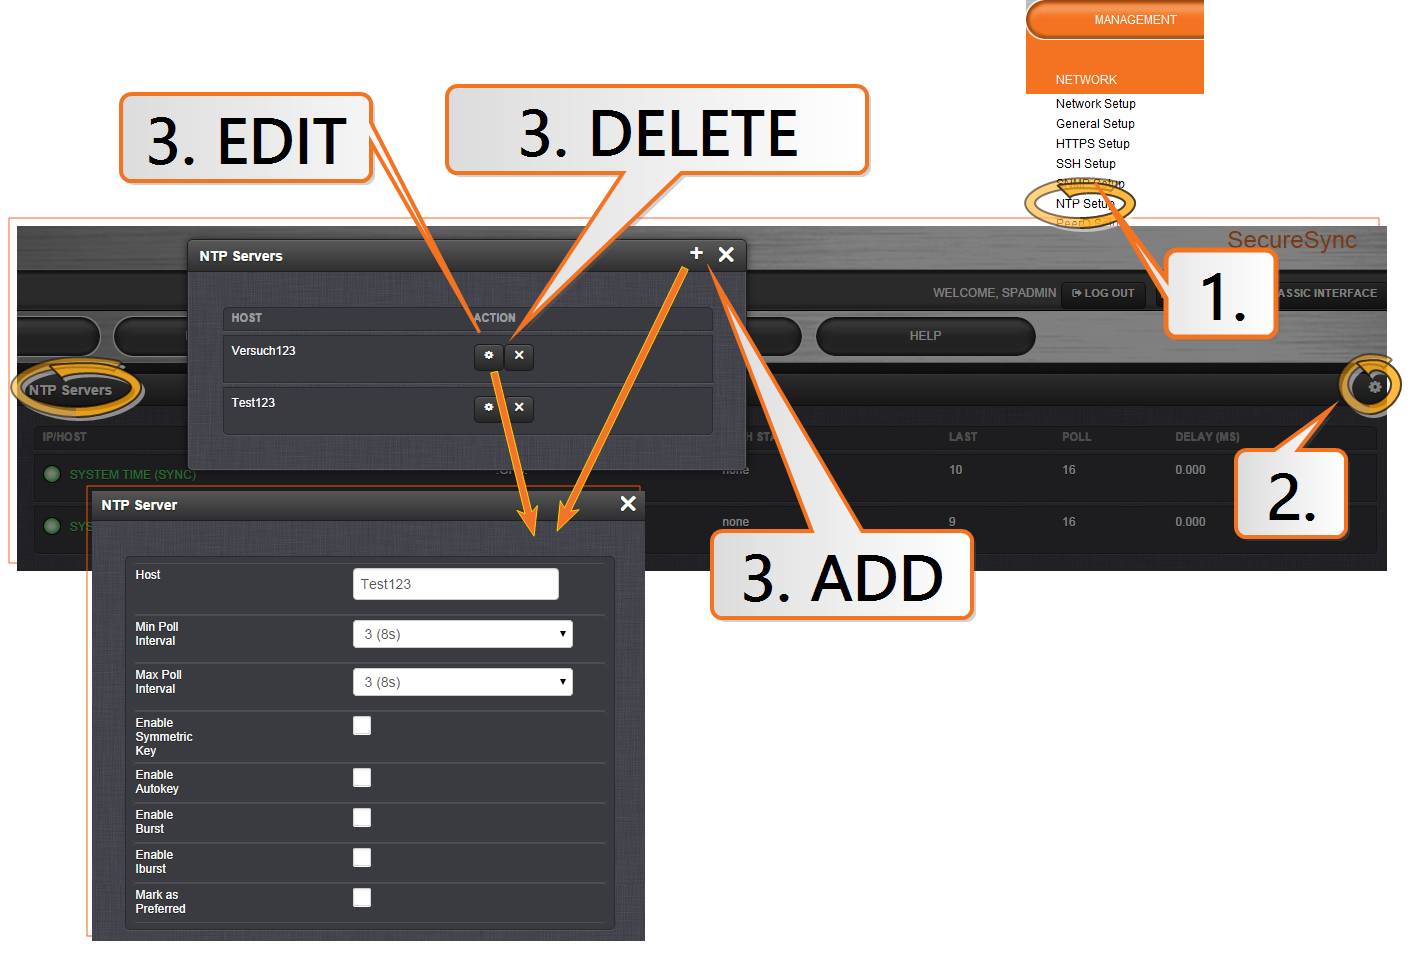
- Navigate to MANAGEMENT > NETWORK: NTP Setup.
- The NTP Setup screen appears. The NTP Servers panel displays a list of recognized NTP servers. Click the GEAR icon in the upper right-hand corner of the NTP Servers panel.
- The NTP Servers window opens. Should the list be empty, no servers have been added yet. In the event that added servers are not displayed in the NTP Setup screen/NTP Servers panel, they could not be resolved. Verify the IP address. Note that System servers cannot be edited or deleted.
- To ADD a new server, click the PLUS icon in the upper right-hand corner, and proceed to the next step.
- To EDIT an existing server, click the corresponding ACTION GEAR button, and proceed to the next step.
- To REMOVE a server (and its associated configurations), click the X-button next to it, then confirm by clicking OK.
- The NTP Server Edit window displays. Enter the required information:
- Host: The IP address for the server to be used as host.
- Min Poll Interval: Select a value from the drop down (the default is 3 (8s)).
Max Poll Interval: Select a value from the drop down (the default is 3 (8s)). For both NTP Peers, and NTP Servers the Minimum and Maximum Poll rate for NTP packets can be configured.
Both NTP Peers and NTP Servers support either manually configured Symmetric Key-ID/Key string pairs or the use of Auto-Key. However, these choices are mutually exclusive and must be identically configured on both the SecureSync and the NTP Peer or NTP Server. If the Symmetric Key-ID/Key string pair method is selected the Key-ID must be first defined on the Symmetric Key page.
- Enable Symmetric Key: Click to enable Symmetric Key, and then select an option from the drop down menu that displays.
Note: Before you can choose an option in the Key field, you must first set up symmetric keys through the Actions panel. See Configuring NTP Symmetric Keys. Conversely, you may check the Autokey box below the Key field.
- Enable Autokey: Click here if you want to use Autokey with this server. See NTP Autokey.
Note: When you configure NTP Autokey, you must first disable the NTP service in the NTP Services panel, and then re-enable it after the Autokey configuration is completed.
- Enable Burst: This tells NTP to send a burst to the remote server when the server is reachable.
- Enable Iburst: The iburst function tells NTP to send a burst of queries instead of one when the remote server is not reachable for faster clock synchronization. This will occur if the connection was interrupted, or upon restart of the NTP daemon. For additional information, please refer to public NTP configuration documentation.
- Mark as Preferred: Click here to make this server the preferred server. For more information, see Configuring "NTP Stratum 1" Operation.
Note: It is not normally recommended to select more than one NTP Server in the NTP Servers table as being Preferred. Typically, only one NTP server should be selected as Preferred.
- Click Submit, or press Enter.
Note: In order for other NTP Servers to be a valid reference, “NTP” must be enabled as both the Time and 1PPS references in the Reference Priority table. See Configuring Input Reference Priorities.