Front Panel Keypad, and Display
To simplify operation and to allow local access to SecureSync, a keypad and an OLED information display menu are provided on the front panel of the unit.
The front panel keypad, information display menu, and status LED menu buttons can be used to configure basic network settings and obtain status information. For more complex functionality, users should refer to the Web UI or Command Line Interface (CLI).
For instruction on changing the front panel time display or locking front panel access, see Configuring the Front Panel.
Using the Keypad
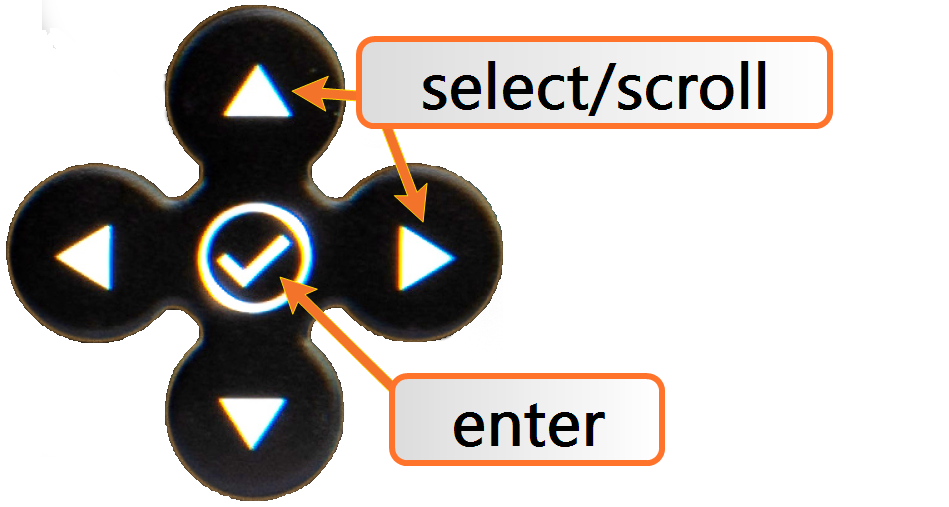
The functions of the five keys are:
- ◀ ▶ ▲ ▼ arrow keys: Navigate to a menu option (will be highlighted); move the focus on the screen; switch between submenus
- ▲ ▼ arrow keys: Scroll through parameter values in edit displays; move the focus on the screen
- ✓ ENTER key: Select a menu option, or confirm a selection when editing
-


 menu buttons: Press these buttons to navigate to each of the seven main menus.
Using the Front Panel Display
There are seven main menu screens on the SecureSync front information display.

Status LED menu buttons
- Your front panel screen will timeout and darken after two minutes of inactivity. If your screen is dark, press any menu or keypad button to wake.
- Press a menu button to enter that menu on the front panel display.
- After entering a menu, the cursor will automatically begin on the submenu selection that you last visited.
- Use the left and right buttons to switch between submenus if necessary.
- To enter into a submenu body, press the down button. You will only be able to highlight fields that can be changed.
- If the field has arrows on either side of your selection, use the directional arrow keys; OR:
- If the line is highlighted, press the ENTER button to change a value, and use the directional keys to obtain the desired setting.
- Once your editing is done, press the ENTER button.
- Press ENTER again to confirm your choice in the confirmation menu that will appear on the right side of the screen.
Front Panel Display: Menu Tree
The illustration below shows how the menu is organized, and which functions can be accessed via the front panel (i.e. without using the Web UI):
.png)
The main menu options and their functions are as follows:
Power Menu:
- Management

- halt the unit
- reboot the unit
- restore the factory defaults
- halt the unit
- Monitoring

- view the temperature status: Board Temp, CPU Temp, and OSC (oscillator) Temp
- view the Fan(s) Speed
- System

- view model number
- view serial number
- view software version
- view licenses
- view a rolling ribbon of option cards installed
- Hot Swap
- this sub menu will only be available if you have a Hot Swap Power Supply configuration. See Hot Swap Power Supply for more information.


GNSS Antenna Menu:
- Constellations

- view the status for GPS, GLONASS, BeiDou, Galileo, QNSS, and SBAS
- turn reception OFF or ON to any satellite system by selecting the status
- Settings

- view or change receiver position mode
- view or set position
- view or change delay
- Monitoring

- view the following information:
- antenna status
PPS validity
- time validity
- state
- view for each satellite system:
- chart of all visible satellites
- view the following information:


Inputs Menu:
- Settings

- view reference table
- enable or disable references
- Monitoring

- view each input reference
- view reference state, time, validity, and phase error


Time Menu:
- Settings:

change the current time display - Monitoring:

view the oscillator type, disciplining state, and TFOM value Date:

view the Day Month Year.


Outputs Menu:
- Settings

- view list of outputs available
- see outputs format
- enable or disable outputs

Network Menu:
- Settings: Scroll to each ETH connection to view information or perform actions
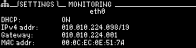
- enable or disable DHCP
- view or set IP address
- view or change gateway
- view MAC address
- Monitoring: View a graph for each ETH connection (highlight eth0 or eth1 and toggle left and right)


Alerts Menu:
- Status

- show current major or minor alarms and descriptions
- Monitoring

- monitor memory usage
- monitor CPU usage
- monitor disk usage
Test

- confirm that the buttons on your front panel are working (highlight Press VALID to start testing buttons and push the ✓ ENTER key).


